Overview of Heat Press Machine
This 8 in 1 heat press machine uses temperature and pressure with a certain amount of time to transfer images on items, the transfer is permanently embedded into the product.
Thank you for choosing our Heat Press Machine. Please read this user manual carefully and keep it for future reference.
If you need any assistance, please contact us by email with your order number and details.
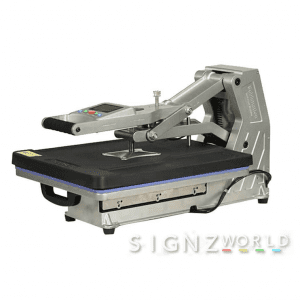
Machine Components
1. Heating Platen
2. Control Box
3. Mug Press 9oz Mug
4. Mug Press 11oz Mug
5. Mug Press 12oz Latte Mug(Cone)
6. Mug Press 17oz Latte Mug(Cone)
7. Hat Element
8. 5 inch Plate Element
9. 6 inch Plate Element
10. Pressure Handle
11. Swiveling Pressure Adjustable
12. Pressure Handle
Package Include
8 in 1 Heat Press Machine x 1
Hat press 5.5″x 3″(14*8cm) x 1
Plate Press 5″/6″ x 2
3″-3.5″ diameter ,11OZ mug press x 1
17oz latte mug(cone) press x 1
9oz mug press x 1
12oz latte mug(cone) press x 1
How to Use Heat Press Machine (For example, T-shirt Printing)
1. Make sure the wire is well connected, the power plug is well connected to the wall socket, then press the power switch to turn on.
2. Rotate the the pressure knob to get the right pressure required.
3. Set the temperature and the time you want.
4. The buzzer will sound when the temperature reaches the setting temperature, then place the object (e.g T-shirt) on press bed, and let the transfer paper with images facing down the object (e.g T-shirt) (PS: Suggest put a white cloth upon the transfer paper to avoid unnecessary mark when set too high temperature.)
5. Press down the handle (meantime the sound will stop) , then press “MODE” button to count down and machine will start to transfer.
6. The buzzer will sound again when the scheduled time is up, then lift up the handle (meantime the sound will stop), the transfer work is Finished.
Recommended Setting for The Object
Clothing transfer: (e.g T-shirt transfer)
Set temperature: 180-200°C (356-392°F)
Set time: Chemical fiber use / Fabric clothing use with sublimation paper: 35-45 seconds; 100% pure cotton clothing use with transfer paper: 20-25 second
Signzworld Hot Sell Heat Press Models
1. 30x38cm 8 in 1 t-shirt, mug, hat heat press
2. MEHP-100C baseball, hat, cap press machine
3. 29x38cm 8 in 1 swivel sublimation press
4. 15x20cm swing heat press combo
Maintenance Note
1. Different item will require different temperature and time setting because the materials or thickness is different.
2. This machine is not suitable for children to use or for food processing.
3. Please turn off the machine and unplug the power cord when the machine is not in use.
4. The heat plate will automatically cool down to the room temperature if the heat press stays non-use for more than 30 minutes
5. For better maintenance of heat press, the maximum setting temperature is 210°C (410°F)
6. To avoid re-heating the first transfer when printing double sided T-Shirts, insert a sheet of cardboard in between the shirt, adjust the height to less pressure, then press.
7. Heat plate may pivot slightly back and forth rotationally. This is due to the movement allowance within the clamp assembly, and it is normal.